There’s little more disheartening for a baker than putting in the effort to create delicious cake pops, only to watch them emerge from the dipping process with unsightly cracks. This common frustration can turn a fun baking project into a head-scratching puzzle. If you’ve ever wondered why your beautifully molded cake balls suddenly split open after being coated, you’re not alone. Understanding the root causes of this cracking phenomenon is the first step toward achieving flawlessly smooth and irresistible cake pops every single time.
Understanding Why Cake Pops Crack: The Science Behind the Splits
The primary culprit behind most cracked cake pops is a scientific principle known as thermal shock. Imagine plunging a very cold object into a significantly warmer liquid; the sudden temperature difference can cause materials to react in unpredictable ways. In the world of cake pops, this happens when a chilled cake ball meets warm candy melts or chocolate coating.
Here’s the breakdown: your cake pop has been cooling, causing its internal structure to contract slightly and become firm. When you dip it into warm, liquid coating, the outer layer of the coating sets almost instantly due because it touches the cold cake ball. However, the slightly warmer interior of the cake pop may still be undergoing subtle expansion as it begins to warm up. Simultaneously, the rapidly cooling outer coating begins to shrink. This combination of an expanding core and a contracting, rapidly hardening shell creates immense stress on the delicate coating, leading to the familiar fissures and cracks. It’s much like dropping an ice cube into boiling water—the sudden change creates a shock that the materials can’t withstand without reacting.
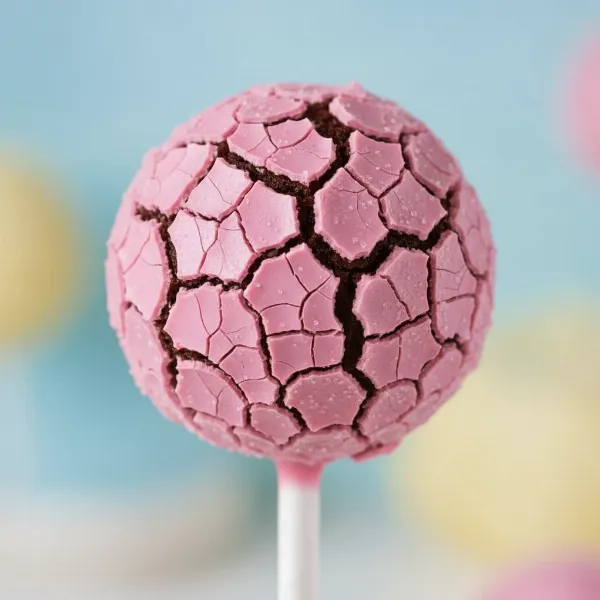 Close-up of a cracked cake pop showing fissures from thermal shock.
Common Mistakes That Lead to Cracked Cake Pops
Achieving cake pop perfection often boils down to avoiding a few common pitfalls. These errors, while seemingly minor, can significantly increase the likelihood of your cake pops cracking.
Over-chilling Your Cake Pops
|
Our Picks for the Best Cake maker in 2026
As an Amazon Associate I earn from qualifying purchases.
|
||
| Num | Product | Action |
|---|---|---|
| 1 | Joydeem Electric Dough Maker with Ferment Function, Microcomputer Timing, Face-up Touch Panel, 7.4Qt, 304 Stainless Steel, JD-HMJ7L |

|
| 2 | Kitchen in the box Stand Mixer,3.2Qt Small Electric Food Mixer,6 Speeds Portable Lightweight Kitchen Mixer for Daily Use with Egg Whisk,Dough Hook,Flat Beater (Blue) |
|
| 3 | Kitchen in the box Stand Mixer,3.2Qt Mini Electric Food Mixer,6 Speeds Portable Lightweight Kitchen Mixer for Daily Use with Egg Whisk,Dough Hook,Flat Beater (Green) |
|
| 4 | Kitchen in the box Stand Mixer,3.2Qt Small Electric Food Mixer,6 Speeds Portable Lightweight Kitchen Mixer for Daily Use with Egg Whisk,Dough Hook,Flat Beater (Black) |
|
| 5 | Cake Maker Lava Cake Maker Mini Donut Maker Waffle Maker Pancakes Maker Machine for Breakfast, Snacks, Desserts Non-stick Surface, Cake Machine, Double-sided Heating, Azure |
|
| 6 | Mini Cake Maker, Portable Mini Bundt Cake Maker Double-Sided Heating, electric cupcake makers for Breakfast, Cake, Snacks (Red) |
|
| 7 | Suuker Cake Cutter, Stainless Steel Cake Knife and Server with Double Handle, Adjustable Cake Slicer for Cake Server, Pie Server, Cake Cutting Set for Wedding |
|
| 8 | Holstein Housewares Non-Stick 6-Count Electric CupCake Maker Machine – Bakes 6 Cupcakes, Muffins, Pizza Cups, Cinnamon Buns – Perfect for Gifts, Birthdays, Holidays, or Bake Sales, Lavender |
|
| 9 | Kitchen in the box Stand Mixer,3.2Qt Small Electric Food Mixer,6 Speeds Portable Lightweight Kitchen Mixer for Daily Use with Egg Whisk,Dough Hook,Flat Beater (Purplish-red) |
|
| 10 | Stand Mixer, Kitchen in the box 3.2Qt Small Electric Food Mixer,6 Speeds Portable Lightweight Kitchen Mixer for Daily Use with Egg Whisk,Dough Hook,Flat Beater (Purple) |
|
One of the most frequent mistakes is leaving your cake pops in the refrigerator or freezer for too long. While chilling is essential to firm up the cake balls and ensure they stay on their sticks, excessive cold is a direct pathway to thermal shock. When cake pops are rock-solid cold, the temperature differential between them and the warm coating is at its maximum, setting the stage for cracks. The goal is “cold enough to hold their shape, but not frozen solid.”
Incorrect Coating Temperature
The temperature of your candy melts or chocolate coating plays a crucial role. If the coating is too hot, it intensifies the thermal shock when it meets a cold cake pop. Conversely, if the coating is too cool or too thick, it won’t apply smoothly and can seize up quickly, also leading to an uneven, brittle shell that cracks easily. A thin, perfectly melted consistency is key for a smooth, even application.
Rushing the Dipping Process
Patience is a virtue in cake pop making. Dipping cake pops straight from the fridge or freezer without allowing them a moment to temper can also contribute to cracking. Even a few minutes at room temperature can reduce the severity of the thermal shock. Rapid, rough dipping techniques can also introduce air bubbles or uneven coating, creating weak points that are prone to cracking.
Type of Coating Used
Not all coatings are created equal. While real chocolate tastes amazing, it can be more temperamental and less flexible than candy melts or candy wafers. Real chocolate, especially if not tempered correctly, can become very brittle when set, making it more susceptible to cracking, particularly if the cake pop underneath experiences any subtle expansion. Candy wafers are often formulated to be more forgiving and flexible, reducing the chances of breakage.
Essential Tips to Prevent Cake Pops from Cracking
Preventing cracks is far easier than fixing them. By implementing a few key strategies, you can dramatically improve your cake pop success rate.
Achieving the Perfect Chill
The sweet spot for chilling cake pops is typically 15-20 minutes in the refrigerator. This duration is usually enough for the cake balls to firm up and hold their shape securely on the stick without becoming excessively cold. If you’re in a rush, a quick 5-10 minute stint in the freezer can work, but do not exceed 10 minutes to avoid freezing them solid. The aim is a firm, but not icy, interior.
Optimal Coating Consistency and Temperature
- Melt Slowly and Carefully: When melting candy melts or chocolate, do so gently in short intervals in the microwave, stirring frequently, or use a double boiler. Overheating makes the coating too hot and prone to seizing.
- Thinning the Coating: If your coating is too thick, it can create a heavy, brittle shell. Thin it with a small amount of vegetable shortening, coconut oil, or a specialized candy oil thinner. Add a tiny amount at a time and stir until you reach a smooth, pourable consistency that easily coats a spoon without being too runny.
- Ideal Temperature: The coating should be warm enough to be liquid and smooth, but not piping hot. Test it on your lip; it should feel pleasantly warm, not scalding.
Tempering Your Cake Pops
After chilling, allow your cake pops to sit at room temperature for about 5-10 minutes before dipping. This slight warming period helps to minimize the drastic temperature difference between the cake ball and the coating, reducing the thermal shock and making the coating less likely to crack.
Dipping Techniques
Dip your cake pops with confidence and a smooth, swift motion.
- Prep the Stick: Dip the tip of your cake pop stick into the melted coating first, then insert it about halfway into the cake ball. Let this initial coat set for a moment to act as a glue.
- Smooth Dip: Dip the entire cake pop into the coating, rotating gently to ensure full coverage.
- Tap Off Excess: Gently tap the stick against the side of your bowl to remove any excess coating. This prevents drips and ensures a thinner, more even, and flexible shell.
 Hands demonstrating proper cake pop dipping technique for smooth, crack-free results.
Allowing for Proper Setting
Once dipped, allow your cake pops to set at room temperature on a stand or in a styrofoam block. While it might be tempting to rush them into the fridge, allowing them to set slowly at room temperature helps the coating contract gradually and uniformly with the cake ball, further reducing the chances of cracking. Only transfer them to the fridge after the coating is completely set if you need to store them.
Troubleshooting and Fixing Already Cracked Cake Pops
Sometimes, despite your best efforts, cracks happen. While a perfectly seamless “fix” can be challenging, especially for major cracks, there are ways to salvage your treats.
Concealing Minor Cracks
For small hairline cracks or minor imperfections, you can often cover them up. A small dab of extra melted candy coating can be smoothed over the crack. Alternatively, use edible glitter, sprinkles, or a decorative drizzle of a contrasting color coating to disguise the area. These decorative elements can turn a flaw into a feature.
Redipping as a Solution
If a cake pop has developed a significant crack, redipping can sometimes work. Make sure the initial coating is completely set. Then, very carefully redip the entire cake pop into your warmed coating, ensuring it’s not too thick. Immediately tap off the excess. Be aware that redipping can sometimes make the outer shell thicker, altering the texture, or in some cases, exacerbate the crack if the cake ball underneath is compromised.
Embracing Imperfections
Let’s be honest: a cracked cake pop still tastes delicious! Sometimes, the best approach is to embrace the imperfection. If the crack doesn’t affect the integrity or hygiene of the treat, consider it a rustic charm. After all, homemade treats don’t always need to be factory perfect to be enjoyed.
Beyond Cracks: Other Cake Pop Troubleshooting Tips
While cracks are a common issue, here are a few other quick tips for common cake pop woes:
- Dough Consistency Issues: If your cake pop dough is too wet, they’ll be hard to roll and may fall apart. If it’s too dry, they’ll crumble. Adjust with a little more frosting or dry cake crumbs respectively until it’s the consistency of play-doh.
- Coating Too Thick or Lumpy: Always thin your coating with a proper thinning agent (shortening, coconut oil) for a smooth finish. Ensure it’s melted thoroughly without overheating.
- Sticks Falling Out: This often happens if the cake balls aren’t firm enough, or if the initial “glue” dip of coating on the stick wasn’t allowed to set properly before insertion.
Expert Insights on Cake Pop Perfection
Achieving perfect cake pops requires a blend of precision and understanding. “When you dip a very cold cake pop into warm candy melts, the outer coating sets too fast while the inside is still expanding slightly from residual warmth or compression,” explains Odette D’Aniello, CEO of Dragonfly Cakes. “This contrast in temperature is what causes the outer chocolate layer to crack.” Her advice underscores the importance of minimizing this temperature shock for a flawless finish.
Frequently Asked Questions About Cake Pop Cracking
How long should cake pops chill before dipping?
Cake pops should typically chill for about 15-20 minutes in the refrigerator to firm up without becoming excessively cold. This prevents severe thermal shock when they are dipped into warm coating.
Can I use real chocolate for cake pops without cracking?
Yes, you can use real chocolate, but it is often more prone to cracking due to its brittle nature when set, especially if not tempered correctly. Candy melts or wafers are generally more flexible and forgiving.
What causes cake pops to fall off the stick?
Cake pops usually fall off the stick if the cake ball is not firm enough, or if the stick wasn’t properly “glued” into the cake ball with a dab of melted coating that was allowed to set before dipping the whole pop.
Can I freeze cake pops after they are dipped?
While it’s generally best to avoid freezing finished cake pops to prevent thermal shock, if necessary for storage, ensure they are completely cooled and individually wrapped. Thaw them slowly in the refrigerator to minimize temperature fluctuations.