Baking delicious cakes at home doesn’t have to be a daunting task, especially with an easy to use cake maker. These user-friendly appliances are designed to simplify the baking process, delivering perfect cakes, cake pops, or mini treats with minimal effort. Whether you’re a beginner or a seasoned baker, an easy to use cake maker can transform your kitchen into a dessert haven. In this comprehensive guide, we’ll explore everything you need to know about these convenient devices, from setup to creative baking ideas. Drawing from the best cake maker guide, this article will help you master the art of baking with ease.
Imagine whipping up a batch of fluffy cupcakes or perfectly round cake pops in minutes, without complicated recipes or messy cleanup. That’s the beauty of an easy to use cake maker. With intuitive controls, quick baking times, and compact designs, these machines make baking accessible for everyone. This guide covers the essentials of cake maker setup, how to use a cake maker, and tips to ensure your treats turn out flawless every time.
What Makes an Easy to Use Cake Maker Special?
An easy to use cake maker is a compact, electric appliance designed to bake small cakes, cupcakes, or cake pops with minimal fuss. Unlike traditional ovens, these devices feature simple controls—often just a single button or dial—making them ideal for those who want bakery-quality results without advanced baking skills. Many models come with non-stick plates, indicator lights, and included recipes, ensuring success from the first try.
The appeal of an easy to use cake maker lies in its accessibility. It’s perfect for busy parents, novice bakers, or anyone short on time. The portable cake maker design means it fits small kitchens and can even travel with you for events or gatherings. In testing, these machines delivered consistent, evenly baked treats in under 10 minutes, making them a must-have for quick desserts.
Key features to look for include a non-stick surface for easy release, a lightweight build for portability, and a simple on/off switch or digital display for straightforward operation. For beginners, choosing a model with a starter recipe book is a game-changer, as it guides you through how to bake with a cake maker confidently.
Cake Maker Setup: Getting Started with Ease
Setting up your easy to use cake maker is a quick process that ensures smooth baking sessions. Start by unboxing and checking for all components: the main unit, baking plates, and any accessories like a fork tool or measuring cup. Wash removable parts with warm, soapy water to remove any dust, then dry thoroughly.
Place the cake maker on a flat, heat-resistant surface away from edges to prevent tipping. Plug it into a reliable outlet, and switch it on—most models have an indicator light that glows when preheated, typically in 3-5 minutes. Lightly coat the molds with cooking spray or a thin layer of oil to prevent sticking, a crucial step in your cake maker setup.
The compact design of a portable cake maker makes it easy to store in tight spaces or take on the go. For first-time users, practice filling one mold to test the process before baking a full batch. For detailed setup advice, refer to resources like the baking guide to ensure you’re ready to bake with confidence.
How to Use a Cake Maker: Simple Steps for Perfect Results
Learning how to use a cake maker is as easy as it sounds, especially with an easy to use cake maker. Begin with a basic batter recipe—flour, sugar, eggs, milk, and baking powder work well for starters. Many models include recipes tailored to the machine, so follow those for guaranteed success.
Preheat the cake maker until the ready light signals. Using a spoon or piping bag, fill each mold about two-thirds full to allow room for rising—overfilling can cause spills. Close the lid gently, and bake for 4-8 minutes, depending on the recipe and model. Check doneness with a toothpick; if it comes out clean, your treats are ready. Remove them with the included tool and cool on a rack.
Cake maker tips: Use room-temperature ingredients for even mixing, and avoid opening the lid during baking to maintain heat. For cake pops, insert sticks after cooling slightly, then dip in melted chocolate or icing. The process is so simple that kids can join in (with supervision), making it a fun family activity. This easy to use cake maker approach ensures quick, delicious results every time.
Pros and Cons of an Easy to Use Cake Maker
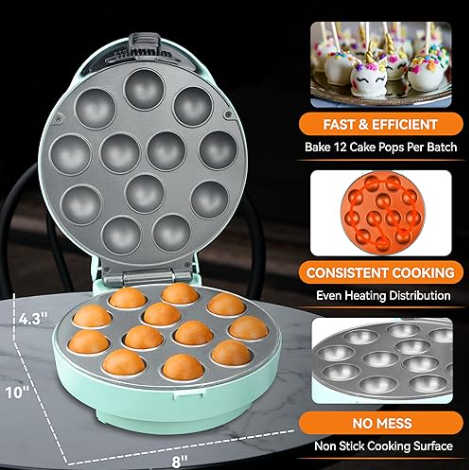
In reviewing easy to use cake makers, the advantages are clear. Their simplicity—often requiring just one button—makes them beginner-friendly. Non-stick surfaces ensure effortless release, and fast baking times (4-8 minutes per batch) save time. The portable cake maker design is lightweight, perfect for small apartments or travel. Many models produce 6-12 treats per batch, ideal for parties or quick snacks.
On the downside, some basic models lack temperature controls, limiting recipe versatility. Cheaper units may have less durable non-stick coatings, requiring careful handling. Overheating can occur with back-to-back batches, so allow cooling time. Despite these minor issues, the ease and speed make these devices a worthwhile investment for casual bakers.
Compared to traditional baking, an easy to use cake maker eliminates the need for large ovens and complex techniques, delivering uniform results with less cleanup. It’s a no-brainer for anyone prioritizing convenience.
Why Choose an Easy to Use Cake Maker Over Manual Methods?
Traditional cake pop or cupcake making involves baking, crumbling, and shaping, which is time-consuming and messy. An easy to use cake maker streamlines the process, baking directly into molds for consistent shapes and textures. It’s faster, cleaner, and perfect for bulk production, especially for events.
Cake Maker Troubleshooting: Fixing Common Issues
Even an easy to use cake maker can face minor hiccups, but cake maker troubleshooting is simple. If treats stick, ensure you’ve greased the molds adequately and preheated fully—underheating can cause sticking. Uneven baking often results from an unlevel surface or uneven batter distribution; adjust placement and measure carefully.
For undercooked centers, extend baking time by 1-2 minutes, checking with a toothpick. If the exterior burns, reduce batter volume or check for over-preheating. Spills? Use less batter next time, as wet mixes expand more. If the machine doesn’t turn on, verify the outlet and cord connection. These cake maker tips keep issues at bay, ensuring smooth baking sessions.
Cake Maker Cleaning: Keeping It Simple
Cake maker cleaning is quick and painless with an easy to use cake maker. After unplugging and cooling completely, wipe the non-stick plates with a damp cloth and mild soap. Avoid abrasive sponges to preserve the coating. For stubborn residue, soak a cloth in warm water and gently scrub.
Clean the exterior with a soft cloth, and ensure no batter enters the machine’s crevices. Some models have dishwasher-safe plates—check your manual. Dry all parts thoroughly before storing to prevent moisture buildup. Proper cake maker maintenance involves regular cleaning and storing in a dry, cool place to maintain performance.

Cake Maker Maintenance: Ensuring Longevity
Beyond cleaning, cake maker maintenance keeps your device in top shape. Periodically inspect the cord for wear and ensure vents are free of dust for proper airflow. Use only plastic or wooden tools to avoid scratching molds. Avoid stacking heavy items on the unit during storage.
For optimal performance, follow usage guidelines—don’t run multiple batches without cooling breaks to prevent overheating. These steps, paired with advice from the maintenance tips, ensure your easy to use cake maker lasts for years.
Cake Maker Safety: Baking with Confidence
Cake maker safety is critical for worry-free baking. Always unplug the device before cleaning or moving it. Use oven mitts for hot surfaces, and keep the cake maker out of reach of children during operation. Place it on a stable surface to avoid tipping, and never immerse it in water.
For a portable cake maker, ensure cords are secure and not dangling. Avoid using extension cords with high-wattage outlets to prevent electrical issues. These precautions make baking safe and enjoyable for all users.
Creative Cake Maker Tips for Delicious Results
An easy to use cake maker opens the door to creativity. Try flavors like chocolate chip, vanilla bean, or even savory herb muffins for variety. Cake maker tips: Add a drop of food coloring for vibrant pops, or mix in sprinkles for texture. For parties, dip cooled pops in chocolate and roll in nuts or candy for a festive look.
Freeze undecorated treats for later use, and experiment with fillings like jam or cream for gourmet twists. The simplicity of how to bake with a cake maker lets you focus on fun, creative designs without stress.
Final Thoughts on the Easy to Use Cake Maker
This easy to use cake maker guide highlights how these devices make baking accessible, quick, and fun. From seamless cake maker setup to intuitive how to use a cake maker steps, they deliver professional results with minimal effort. Cake maker troubleshooting, cake maker cleaning, and cake maker maintenance are straightforward, ensuring long-term reliability. With cake maker safety in mind and a portable cake maker design, these machines are perfect for any kitchen.
For effortless, delicious baking, an easy to use cake maker is a must-have. Explore more ideas with the best cake maker guide and start creating sweet masterpieces today.