For baking enthusiasts who love creating delicious treats anywhere, a portable cake maker is a game-changer. These compact, lightweight appliances make it easy to whip up cakes, cupcakes, or cake pops at home, at a friend’s house, or even on the go. In this detailed portable cake maker review, we’ll explore why these devices are perfect for beginners and seasoned bakers alike, covering everything from setup to creative baking ideas. Drawing from the best cake maker guide, this guide will help you decide if a portable cake maker is the right addition to your kitchen arsenal.
Imagine baking a batch of perfectly round cake pops or mini cupcakes in minutes, whether in a dorm, a small apartment, or a vacation rental. A portable cake maker delivers convenience without sacrificing quality, offering non-stick surfaces, fast baking times, and easy storage. This portable cake maker review dives into the features, benefits, and tips to ensure your baking experience is seamless and fun.
What Is a Portable Cake Maker?
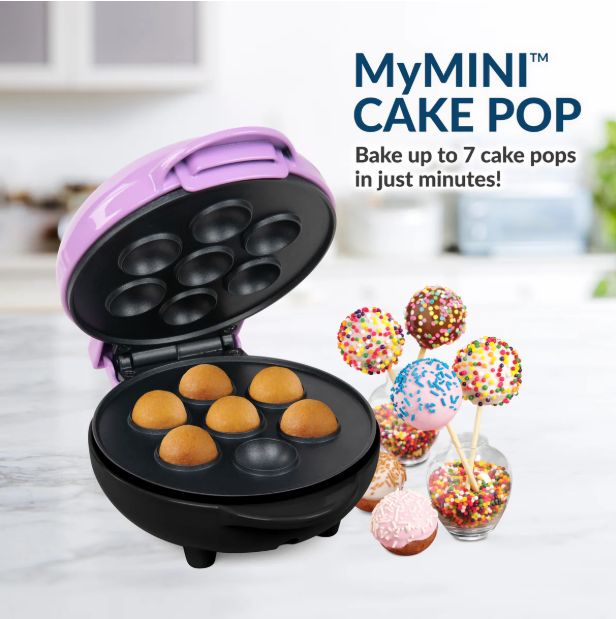
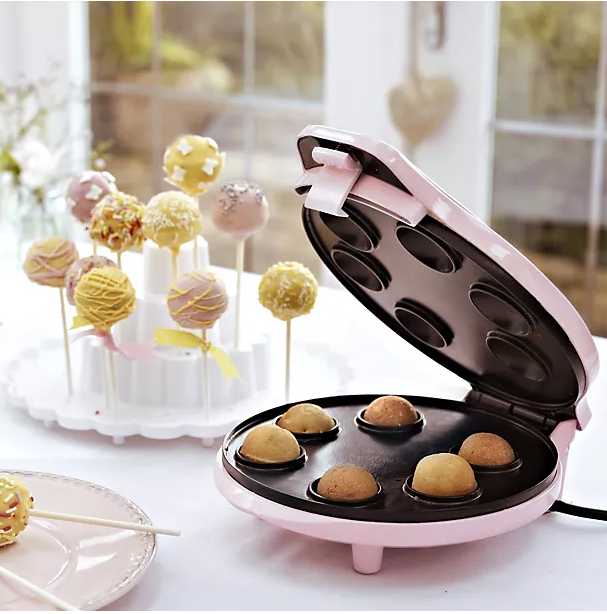
A portable cake maker is a compact, electric appliance designed to bake small cakes, cupcakes, or cake pops quickly and efficiently. Unlike traditional ovens, these devices are lightweight (typically 2-4 pounds), easy to carry, and require minimal counter space, making them ideal for small kitchens or travel. Many models feature non-stick molds, simple controls, and indicator lights, ensuring ease of use for all skill levels.
The standout feature of a portable cake maker is its portability. Weighing less than many kitchen gadgets, these machines often come with cord wraps and upright storage options, perfect for tight spaces or on-the-go baking. They heat up in 2-4 minutes and bake treats in 4-8 minutes, saving time and energy compared to ovens. In testing, models like the Babycakes Cake Pop Maker excelled for their simplicity and consistent results, making them a top choice for portable baking.
When choosing a portable cake maker, prioritize non-stick plates, a secure lid with a latch or safety lock, and included accessories like recipe books or decorating tools. These features make how to bake with a cake maker approachable, especially for beginners.
Cake Maker Setup: Quick and Easy for Any Space
Setting up a portable cake maker is a breeze, even in cramped quarters. Start by unboxing and inspecting components: the main unit, non-stick plates, power cord, and any extras like a fork tool or cooling rack. Wash removable parts with warm, soapy water to remove manufacturing residue, then dry thoroughly.
Place the portable cake maker on a flat, heat-resistant surface, ensuring it’s stable and away from edges. Plug it into a standard outlet, and turn it on—most models have a single power switch and a light that signals preheating is complete (typically 3-5 minutes). Lightly grease the molds with cooking spray or oil to prevent sticking, a critical step in your cake maker setup.
The compact design—often under 10 inches wide—makes it perfect for small spaces, and features like cord wraps and vertical storage enhance portability. For first-time use, run an empty cycle to eliminate any odors. For more setup tips, check out the baking guide tailored to portable devices.
How to Use a Cake Maker: Simple Steps for Delicious Treats
Mastering how to use a cake maker is effortless with a portable cake maker. Begin with a basic batter recipe—many models include beginner-friendly options for vanilla, chocolate, or even donut holes. Mix flour, sugar, eggs, milk, and baking powder until smooth. A simple recipe ensures success while you learn.
Preheat the cake maker until the indicator light signals it’s ready. Use a piping bag or spoon to fill molds about two-thirds full to avoid overflow. Close the lid securely, and bake for 4-7 minutes, depending on the model and recipe. Check doneness with a toothpick; if clean, use the provided tool to remove treats and cool them on a rack. For cake pops, insert sticks after slight cooling, then dip in melted chocolate or icing.
Cake maker tips: Use room-temperature ingredients for even mixing, and avoid opening the lid during baking to maintain consistent heat. A piping bag ensures precise filling, reducing mess. The process is so simple that you’ll have a batch of 6-12 treats ready in under 10 minutes, perfect for spontaneous gatherings.
Pros and Cons of Portable Cake Makers
This portable cake maker review highlights several advantages. Their lightweight design (often under 4 pounds) and compact size make them easy to transport and store, ideal for small kitchens or travel. Non-stick plates ensure easy release and cleanup, while fast baking times (4-8 minutes) save energy. Many models, like the Brentwood TS-254, bake 12 cake pops in just 4 minutes and include recipes for variety, such as lemon pops or pancake bites.
Cons include limited capacity—most produce 6-12 treats per batch, which may not suffice for large events. Basic models lack temperature controls, restricting recipe flexibility. Some users note a slight seam on cake pops where molds meet, though icing easily covers this. Overheating can occur with continuous use, so allow cooling between batches. Despite these, the convenience and portability outweigh minor drawbacks for most users.
Compared to traditional baking, a portable cake maker eliminates the need for ovens and complex shaping, producing uniform treats with less effort. It’s a must-have for quick, portable baking.
Portable Cake Maker vs. Traditional Methods
Traditional cake pop making involves baking a full cake, crumbling it, and mixing with frosting—messy and time-consuming. A portable cake maker bakes directly into molds, creating lighter, fluffier treats in minutes. It’s cleaner, faster, and ideal for small batches or on-the-go events, like bake sales or parties.
Cake Maker Troubleshooting: Easy Fixes for Common Issues
Cake maker troubleshooting is straightforward with a portable cake maker. If treats stick, ensure molds are greased and fully preheated—underheating often causes sticking. Uneven baking? Check that the unit is level and batter is evenly distributed. For undercooked centers, extend baking by 1-2 minutes, testing with a toothpick.
Burnt edges may indicate overfilled molds or excessive preheating; use less batter or check timing. If the machine doesn’t start, verify the outlet and cord connection. Overflows happen with overly wet batters—reduce liquid slightly. Allow 10-minute cooling breaks between batches to prevent overheating. These cake maker tips ensure smooth operation, even for novices.
Cake Maker Cleaning: Quick and Hassle-Free
Cake maker cleaning is a snap with a portable cake maker. After unplugging and cooling completely, wipe non-stick plates with a soft, damp cloth and mild soap. Avoid abrasive scrubbers to preserve the coating. For stubborn residue, use a damp paper towel with gentle pressure.
Clean the exterior with a dry or slightly damp cloth, ensuring no liquid enters vents. Some models have dishwasher-safe plates—check your manual. Dry all parts thoroughly before storing to prevent moisture buildup. The compact design makes cake maker cleaning quick, keeping your device ready for the next use.
Cake Maker Maintenance: Keeping Your Portable Device in Top Shape
Cake maker maintenance ensures your portable cake maker stays reliable. Regularly inspect the cord for wear and keep vents dust-free for proper airflow. Use only plastic or wooden tools to avoid scratching molds, and store in a dry, cool place to prevent damage.
Avoid continuous baking without cooling breaks to prevent overheating, which can trigger safety shutoffs in models like the Brentwood TS-254. Following these steps, along with advice from the maintenance tips, keeps your cake maker performing like new.
Cake Maker Safety: Baking with Peace of Mind
Cake maker safety is crucial for worry-free use. Always unplug the portable cake maker before cleaning or moving. Use oven mitts for hot surfaces, and keep it out of children’s reach during operation. Place on a stable surface to prevent tipping, and never immerse in water.
Features like safety locks or auto-shutoff, found in models like the Aoruru Cake Pop Maker, enhance safety. For portable use, secure the cord to avoid tripping hazards. These precautions ensure safe, enjoyable baking sessions.
Cake Maker Tips: Creative Ideas for Portable Baking
A portable cake maker opens up endless possibilities. Try classic vanilla or chocolate pops, or experiment with flavors like pumpkin spice or blueberry. Cake maker tips: Add sprinkles to batter for fun textures, or dip cooled pops in white chocolate for a festive look. Savory options like cheese bites or mini cornbread pops are great for appetizers.
Freeze undecorated treats for later, or decorate with simple icing drizzles for events. The portability makes it perfect for bake sales or picnics—just plug in and bake. How to bake with a cake maker becomes a creative outlet with these easy ideas.
Final Thoughts on the Portable Cake Maker
This portable cake maker review shows how these compact devices make baking accessible, fast, and fun. From simple cake maker setup to intuitive how to use a cake maker steps, they deliver consistent results with minimal effort. Cake maker troubleshooting, cake maker cleaning, and cake maker maintenance are straightforward, ensuring durability. With cake maker safety features and a portable cake maker design, they’re perfect for any setting.
For effortless baking anywhere, a portable cake maker is a top choice. Explore more inspiration with the best cake maker guide and start baking delightful treats today.